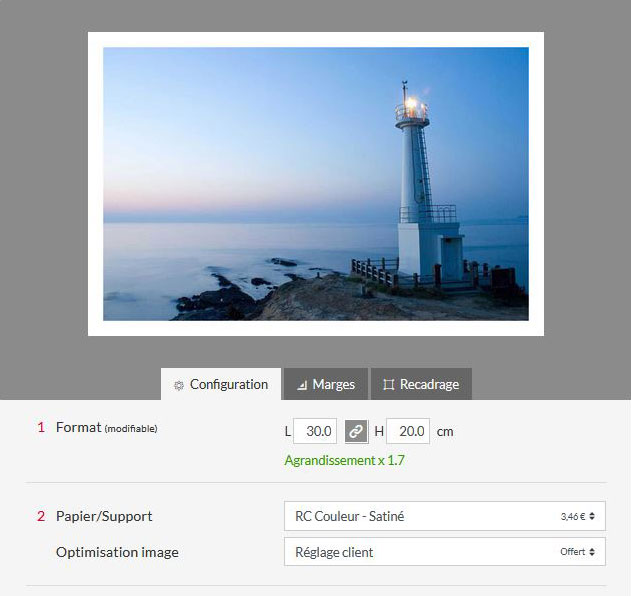
Help / Margins and Cropping
Marges
Adding outer or inner margins
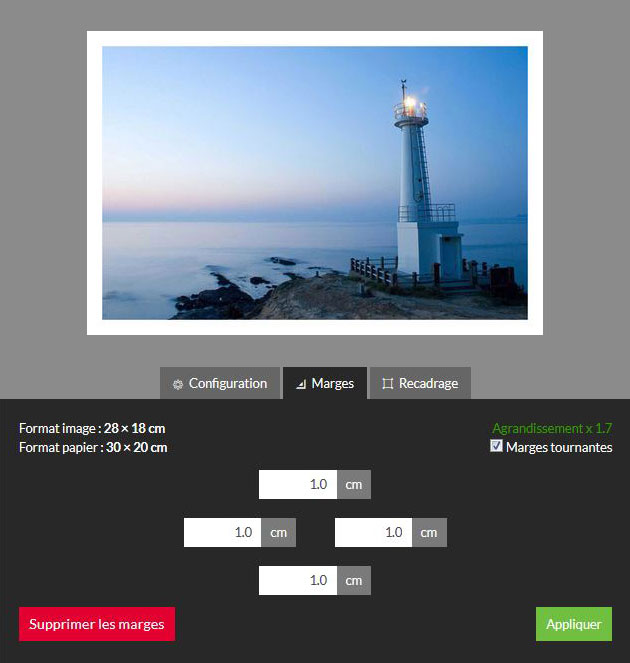
With our Margins tool in the settings page, you can go further in the preparation of your print by adding white margins around your image. The margins will either be added to the outside or integrated into the dimensions of the print that you have previously indicated in the "Configuration" tab.
Free margin sizes
You are free to choose the size of the margins from 1 cm upwards, their dimensions can be equal on each side of the image (called "rotating margins") or different for each side.
Rotating margins
The "Rotating margins" option, checked by default, allows you to automatically add identical margins all around your image by entering a dimension in cm on one of the sides.
If you want unequal margins, uncheck the "Rotating Margins" option and enter the desired dimensions for each side of the image.
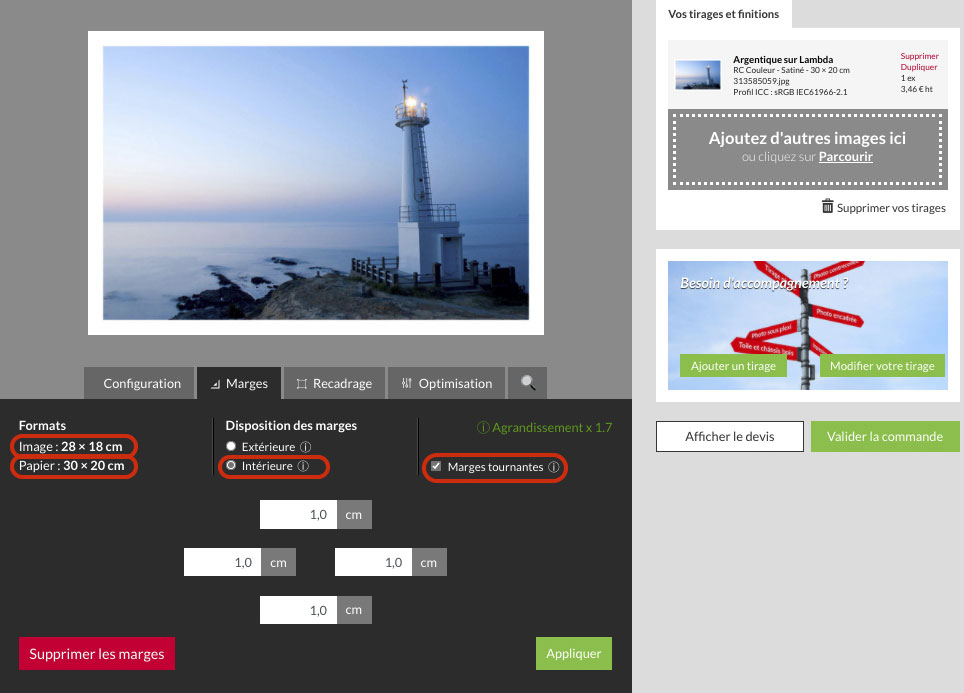
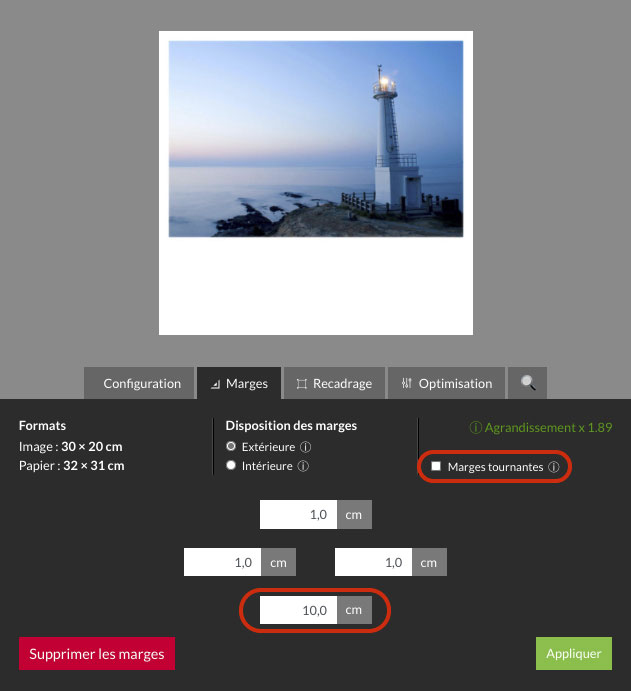
External Margins
By selecting "Margin layout: Outside" the initial dimensions of the paper print increase with the addition of the margin, the result is displayed in "Formats".
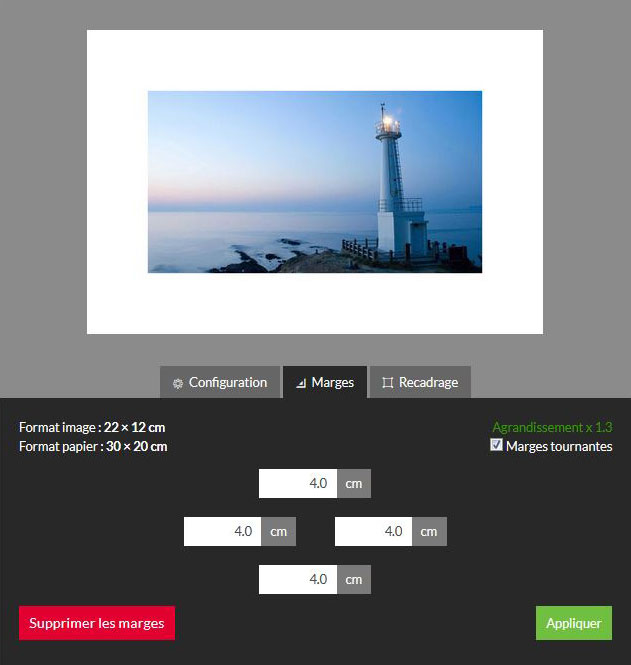
Here for example a print initially of 30x20 cm to which we add equal external margins of 1 cm on each side by leaving the checkbox "Rotating margins" becomes a print of 32x22 cm, the image is always 30x20 cm.
Inner margins
By selecting "Margin Layout: Inside" the initial dimensions of the paper print are not modified, it is the image size that is reduced, the result is displayed in "Formats".
Here for example, a print originally 30x20 cm to which we add inner margins of 1 cm equal on each side by leaving "Rotating margins" checked remains a print at 30x20 cm but the image is reduced to 22x18 cm.
Free margins
By unchecking the option "Rotating margins" you can choose the dimensions of each margin.
Check the result in "Configuration".
Once the preparation of your margins is finished, click on "Apply" to look at the result and then go to the "Configuration" tab to check your preparation
To know how to add the inner margins
Selecting the image area
As your image is reduced by the integration of the margins inside your print format, the original proportions of your visual will not be preserved, especially if the dimensions of your margins are large.
Once you have finished preparing your margins and clicked on "Apply", you can control the new proportions of your image in the print by going to the "Crop" tab.
By default, the crop is centred in the middle of your image. You can change the cropping by dragging the white selection frame, and then you can choose the area of your image that you want to focus on.
Example: you want a 30x20cm print with a 4cm margin on each side of the image, the dimensions of your image will be reduced to 22x12cm.
From "Crop", by dragging the white selection frame, you can then choose the area of your image that you want to focus on, in this case either the top or the bottom of the image.
Note: If you first set your margins with the "Margins" tool, the use of "Crop" is only limited to the choice of the image area. If you wish to crop your image freely, please do so before setting the margins.
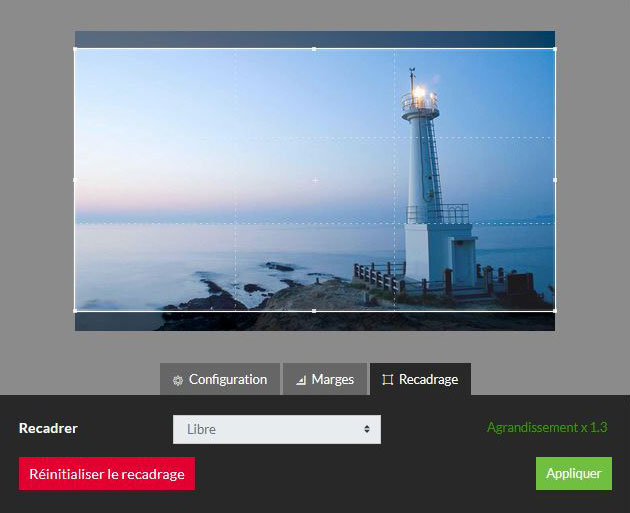
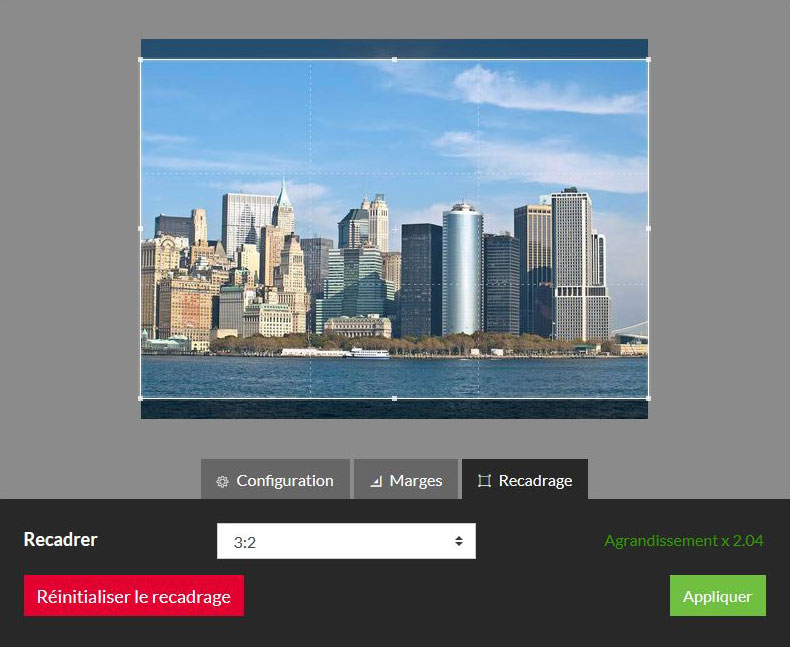
Crop
From the settings page, our Crop tool allows you to select the cropping area on your image that you want to use for your print.
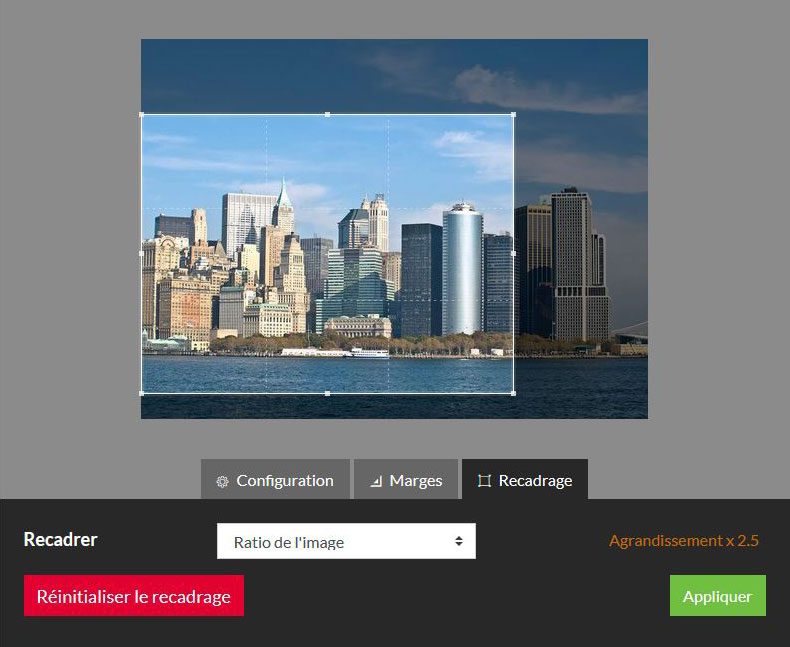
Different types of cropping are available: either Ratio of the image by a selection zone respecting the original proportions of your image or by a predefined Ratio (example 2:3, 16:9, square,...), or Free without any constraint by letting you make your selection in all freedom.
Once the cropping is done by dragging one of the points (white squares) and/or by moving the selection area, click on "Apply" to check the result. The magnification indicator updates its information to help you judge the quality of your cropped image according to the dimensions indicated in the "Configuration" tab. You can remove the cropping by clicking on "Reset Crop".
Image ratio :
By default, we propose a cropping that keeps the original proportions of the uploaded image: you can drag the points (white squares) but the selection area is constrained to keep the homothety of the original image.
Once you have clicked on "Apply" the magnification indicator will refresh to help you monitor the quality of the cropped print.
Note: The dimensions of the print indicated in the "Configuration" tab are not modified.
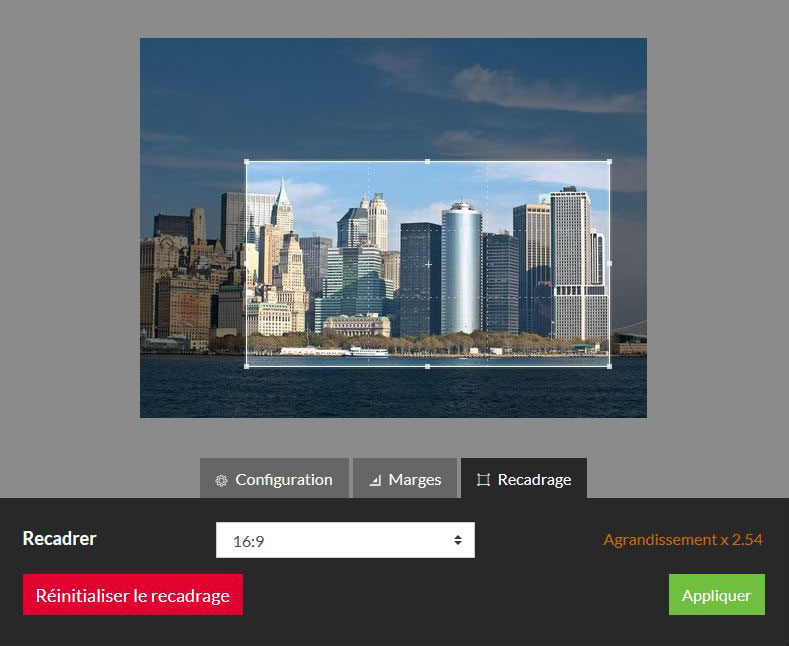
Predefined ratio :
You can drag the dots (white squares) but the selection area is constrained to the ratio you have chosen.
You can choose between the following ratios: Square 1:1:, 8:10 - 10:8, 3:4 - 4:3, 5:7 - 7:5, 2:3 - 3:2, 3:5 - 5:3, 9:16 - 16:9 .
Once you click on "Apply" the magnification indicator will refresh to help you monitor the quality of the cropped print.
Please note: The dimensions of the print are automatically modified to fit the ratio selected in the "Configuration" tab.
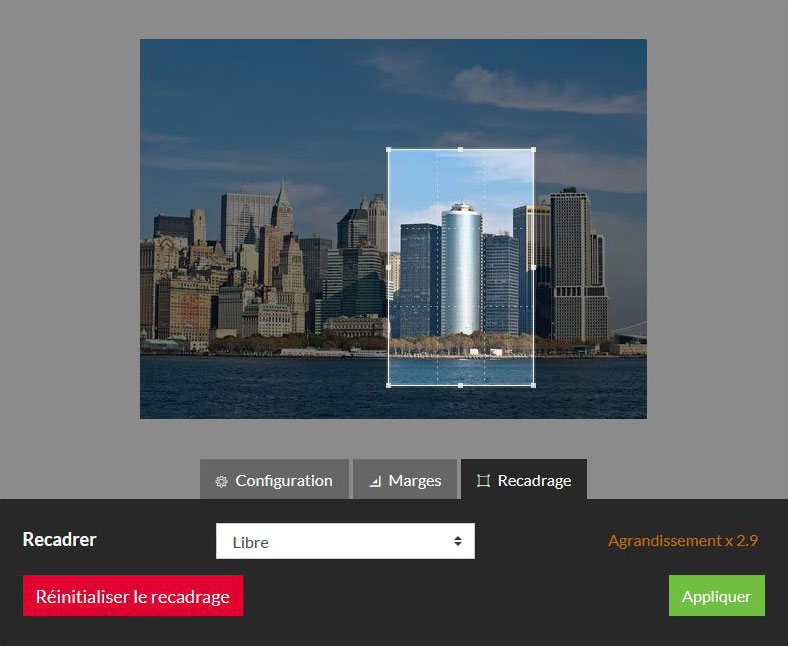
Free :
You can freely drag the dots (white squares) without constraint to obtain the desired selection in your image.
Once you have clicked on "Apply" the magnification indicator will refresh to help you monitor the quality of the cropped print.
Please note: The dimensions of the print are automatically modified in the "Configuration" tab.
Deactivating the original proportions :
When preparing your print in the "Configuration" tab, you can freely indicate your format even if it does not correspond to the original proportions of your image.
Example: you want a print of 30 cm by 20 cm but when you indicate 32 cm in width, the height automatically displays 22.5 cm.
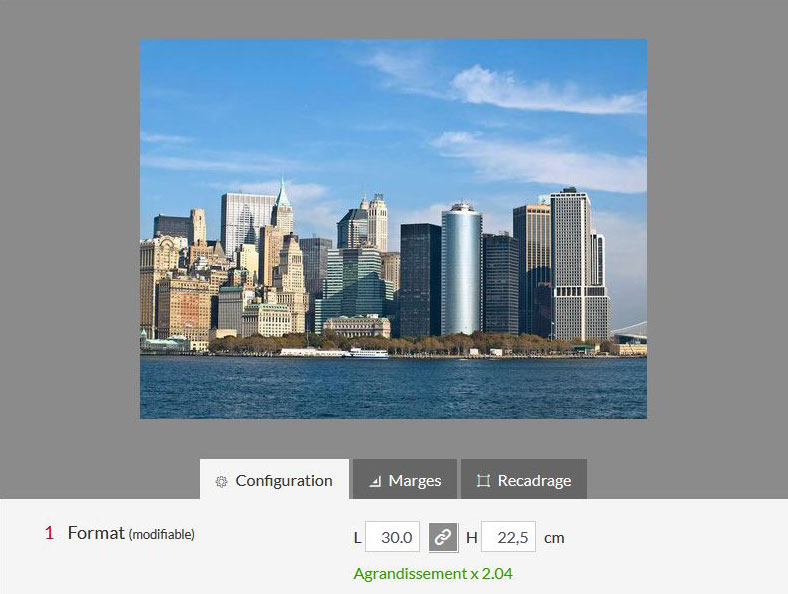
To unblock the original proportions of the image, you need to click on the grey button that displays "Deactivate proportions" on mouse over, it is illustrated by two linked links located between Width and Height.
You then freely indicate the desired dimensions and click on "Apply", the image will be cropped to the centre by default to correspond to the desired format.


By default, the crop is centred in the middle of your image. If you wish, you can then choose the exact cropping area by clicking on the "Crop" tab.
Once you have moved the white rectangle corresponding to the area you wish to keep on your final print, you must click on "Apply" and then check the update of the magnification indicator.
Finally, check the preparation of your cropped print in the "Configuration" tab.